
A Guest Post by Jeff Gregory about Cute Cut Version 1.8.7 Pro:
Cute Cut comes in 2 versions: Basic (Free) or Pro (Paid) and will run on any Android version after 4.1.
The ‘Free’ version has a ‘Cute Cut’ water mark and exports are limited to 30 seconds. The movie on the timeline can be any length, but you can only export 30 secs.
The ‘Pro’ version both removes the watermark and allows for unlimited length export. The Pro version costs $5.99 + tax.
Cute Cut allows for six different types of media on the timeline: video, image, text, self-draw, music, and Voice Over.
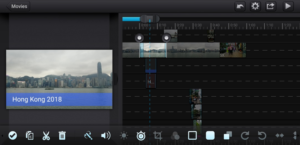
The time line can have up to two video layers, plus multiple text, self-draw, music and VO layers as shown below:

Each layer can be manipulated with regards to image size, PIP, placement, effects, border, shadow, etc.
The ‘Self Draw’ feature can easily be used to create gradients or combine with a text layer to create lower thirds and other graphics.
QUIRK: If an element has a transition applied, the element is then locked and cannot be adjusted in any way other than moving it along the timeline. If you want to make adjustments to an element’s size, color, placement on screen etc., you first must remove any transitions that have been applied to that element. Make any desired adjustments, then reapply the transition. In the example shown below, a video clip has been selected, but several of the tools are greyed out. To enable these tools, the transitions (the blue section at each end of the clip) need to be removed to re-enable the greyed-out tools.
Video elements on the timeline can be adjusted for slow or fast motion playback from 0.25% to 400%.
When starting a new project, you are given the opportunity to select HD 16:9, SD 4:3, or Social Media Square 1:1 format. The default orientation is Horizontal, but you can select vertical if you are creating content for Instagram Stories, etc. At this point, you can also select the desired frame rate from 60, 30, 25, or 24fps.
The output options available depend on the resolution chosen in initial setup. The resolution settings can also be accessed by pressing the ‘settings’ ( ) button. If you select ‘SD 4:3’, ‘Square 1:1’, or ‘Portrait 9:16’ resolutions then the output options are ‘High’, ‘Medium’ or ‘Low’. If you select HD and horizontal, then there are 4 quality settings for export: ‘HQ1080’, ‘HQ720’, ‘Medium’ and ‘Low’. I created a simple 1:00 minute video with 2 video layers, 1 ‘self-draw’ layer, 1 text layer, 4 image layers with animated transitions, and 1 music layer. When I exported the same project using the 4 different quality levels the resulting file specs were as follows:
| Quality | Frame Size | Video Codec | Audio Codec | Bit Rate | File Size |
| HQ1080 | 1920×1080 | H.264 | AAC 44.1KHz | 14.62 mbits/sec | 104 MB |
| HQ720 | 1280×720 | H.264 | AAC 44.1KHz | 9.88 mbits/sec | 70.7 MB |
| Medium | 768×432 | H.264 | AAC 44.1KHz | 4.91 mbits/sec | 35.1 MB |
| Low | 640×360 | H.264 | AAC 44.1 KHz | 1.06 mbits/sec | 7.67 MB |
The app does not give any control over the output settings of each export quality level. Nor does it give control over where the resulting file is placed. The default location is ‘Internal Storage/DCIM/Camera’. e.g. it cannot be set to put the file on an SD card.
When played back on a phone, each of the different output qualities looked good, but when it’s played back on a computer there are noticeable artifacts from compression when using the ‘Low’ output setting.
Both the Google Play Store and the MobiVio Website imply that you can output directly to social media right from the Cute Cut time line. However, the version I reviewed only gave the option to output to camera roll.
Summary:
Pros:
Overall, I liked the app. I found it intuitive and easy to put together a short video with multiple elements. Transitions can be used not only for transitioning between media elements but also as a sort of key frame to control such things as color, position, size, etc.
I feel it competes well with established mobile editing apps such as Power Director and KineMaster and has the advantage of not being a subscription. You cannot realistically do anything other than very short projects with the free version since it is limited to no more than 30 secs of output, but since it is only a one-time cost of $5.99 + Tax for the full ‘Pro’ it is much better than any of the subscription model apps.
I formerly used Power Director if I was editing on my phone. I think from now on I will consider using Cute Cut.
Cons:
When making a cut into a video clip on the time line, I found it hard to see where I have made a cut. It would be better if the developer added something other than a very thin black line to display a cut, making it easier to see.
I found it difficult to grab the ‘handles’ when adjusting the length of an element on the timeline. You can spread out the timeline horizontally, not vertically. Also, when using the ‘handles’ to adjust the length of an element, my finger covered the end of the clip, so I could not see whether I had moved it the correct amount or not.
When resizing elements in the preview window, it is hard to not also rotate. It would be better if you had to tap another button to enable rotate. As it is, rotate and resize are available by default when you add media to the timeline or later select it without any transitions being applied. But I found it hard to resize without also rotating it a little. There is a button to reset, but it resets to both original size and rotation.
Devices used in review: Samsung Galaxy S8, Samsung S4, Generic Android Tablet with Android 4.2.1